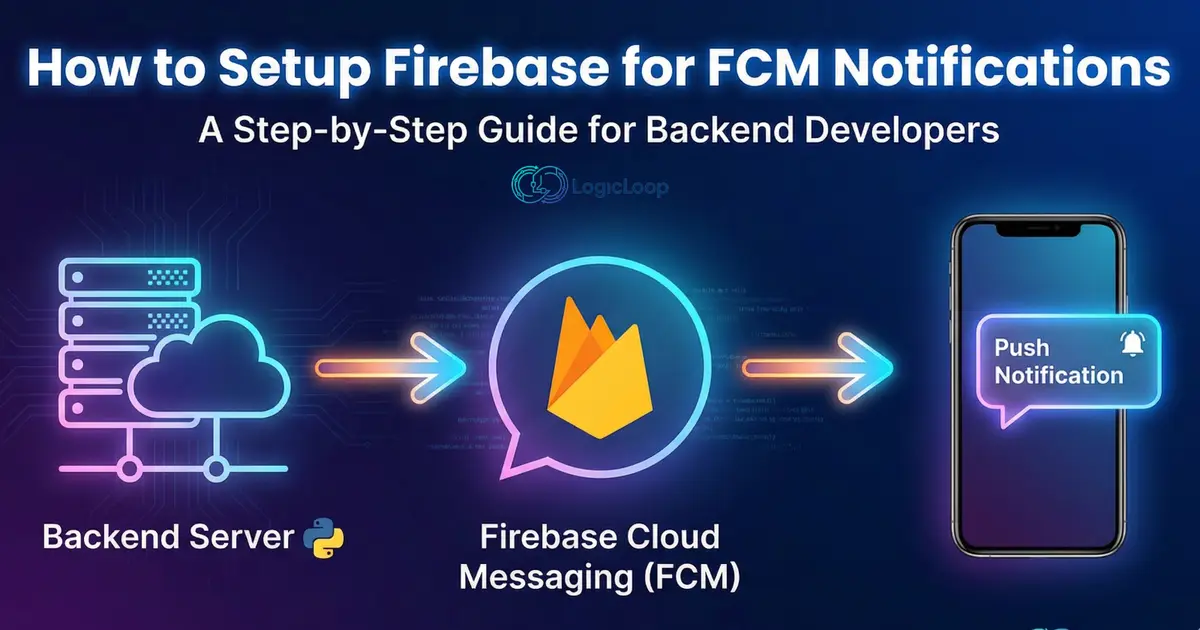
Before you can send a single push notification to a user’s device, you need infrastructure. You need a service that can act as the post office, accepting messages from your backend and delivering them to Android, iOS, or Web apps.
That service is Firebase Cloud Messaging (FCM).
For backend developers, setting up Firebase is the non-negotiable first step. It’s where you get the credentials - like the Project ID and Service Account Key - that your Python, Node.js, or Go backend will use to authenticate against Google’s servers.
In this guide, I will walk you through the exact steps to create a Firebase project and get the critical configuration files you need to start building your notification engine.
Prerequisites
- A Google Account (Gmail, Workspace, etc.).
🧐 The Basics: What is Firebase & FCM?
If you are new to cloud development, these acronyms might sound confusing. Let’s break them down.
1. What is Firebase? Think of Firebase as a “Backend-as-a-Service” (BaaS) platform acquired by Google. It provides a suite of tools - like databases, authentication, hosting, and analytics - that let you build apps faster without managing physical servers. instead of building a login system from scratch, you just “plug in” Firebase Auth.
2. What is FCM (Firebase Cloud Messaging)? FCM is the specific tool within the Firebase suite used for Notifications.
Imagine you have a messaging app. When User A sends a message to User B, how does User B’s phone know to buzz? You can’t just keep the phone’s screen on forever waiting for data. FCM acts as a global post office. Your backend server hands the message to FCM, and FCM handles the complex job of waking up User B’s device (whether it’s an iPhone, Android, or Web Browser) and delivering the notification efficiently.
Why do developers use it?
-
It’s Free: You can send unlimited messages at no cost.
-
It’s Cross-Platform: You write one backend code, and FCM handles the differences between Apple’s system (APNs) and Android’s system.
-
It’s Reliable: Google processes hundreds of billions of messages per day through this infrastructure.
Step 1: Create a New Firebase Project
First, we need to create a container in Google’s cloud for your application’s data and services.
-
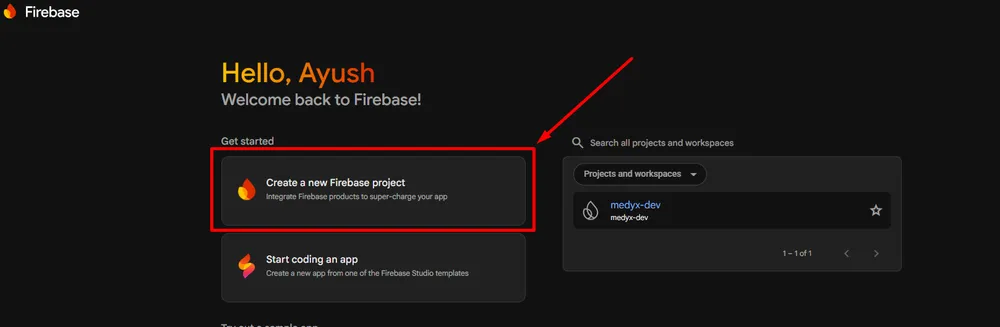
Navigate to the Firebase Console.
-
Click on the big “Create a project” (or “Add project”) card.
-
Enter a project name. This can be anything, like
LogicLoop-DemoorFCM-Test-App. Firebase will automatically generate a unique unique identifier below it. Accept the terms and click Continue. -
Google Analytics: For a pure backend notification setup, you can disable Google Analytics for now to keep things simple. Click Create project.
-
Wait a few seconds for the setup to finish, then click Continue. You will be taken to your new project’s overview dashboard.
Step 2: Navigate to Project Settings
Right now, you have a project, but no credentials. As a backend developer, you don’t necessarily need to register an iOS or Android app yet. You just need the server-side keys.
-
On the left-hand sidebar menu, click the gear icon (⚙️) next to “Project Overview”.
-
Select Project settings from the popup menu.
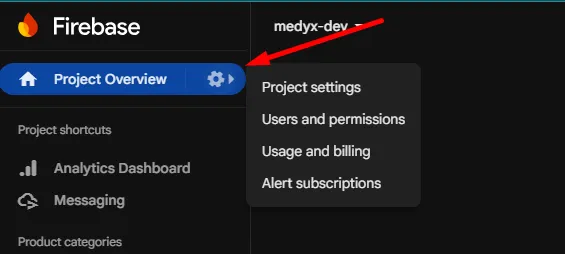
This page contains all the meta-data about your project. Make a note of your Project ID, as you will often need it for SDK integration.
Step 3: Get the FCM Service Account Key (The Important Part)
This is the most critical step. To send notifications from a backend server (like a Python FastAPI service), you need secure credentials.
Historically, Firebase used a “Server Key”. This is now considered the legacy API. The modern, secure way is to use the Firebase Admin SDK with a Service Account.
-
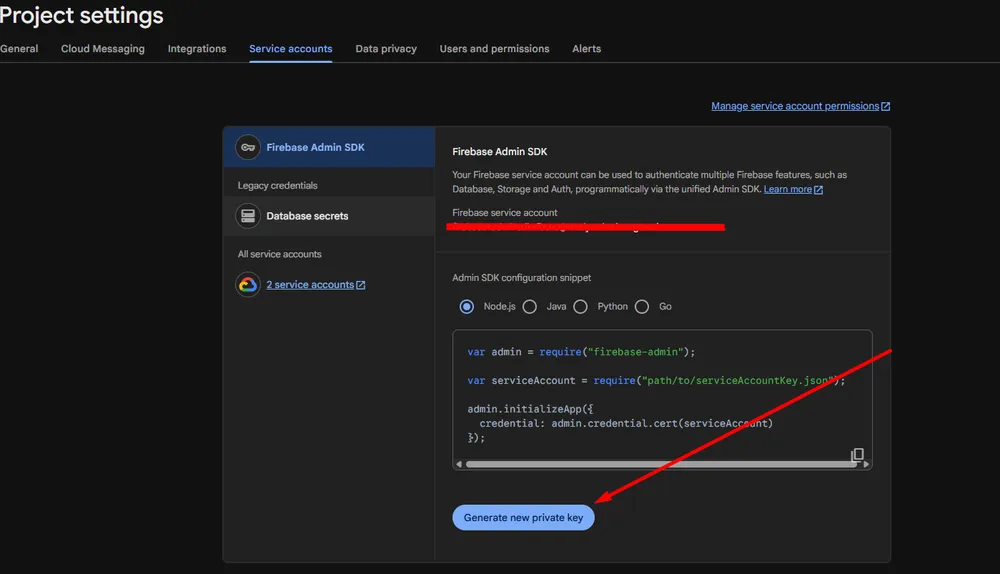
In the Project settings menu, click on the Service accounts tab.
-
You will see a code snippet showing how to use the Admin SDK in various languages (Node.js, Java, Python, etc.).
-
Below that, look for a button labeled Generate new private key.
-
A warning window will popup. Read it - it tells you to keep this key safe! Click Generate key.
-
A
.jsonfile will automatically download to your computer.
⚠️ STOP AND SECURE THIS FILE ⚠️
This JSON file contains your project’s private key. Never commit this file to a public GitHub repository. Anyone who has this file can send notifications on your behalf and control your Firebase project. Store it securely on your local machine or use a secrets manager in production.
Conclusion
Congratulations! You have successfully laid the foundation.
-
✅ You created a Firebase Project.
-
✅ You navigated the console to find project settings.
-
✅ You generated and downloaded the secure Service Account JSON key.
Your backend now has the “passport” it needs to talk to Google’s servers. The next step is to write the code that uses this key to actually send a message. We will cover that in the next tutorial.
Working on something similar?
If you're building backend or AI systems and want a second set of senior eyes, let's talk.